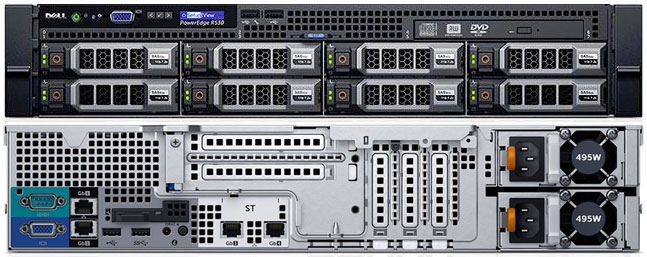
How to Install Windows Server 2008 Standard Edition on Dell PowerEdge R530 Server
Installing Windows Server 2008 Standard Edition on Dell PowerEdge R530 Server is not easy because there is no option for that operating system, the options on the screen are:
1. Microsoft Windows Server 2012
2. Microsoft Windows Server 2012 R2
3. Microsoft Windows Server 2008 R2 with SP1
4. Red Hat Enterprise Linux 6.7 x64
5. Red Hat Enterprise Linux 7.1 x64
6. SuSE Enterprise Linux 11 SP4 x64
7. SuSE Enterprise Linux 12 x64
8. VMware ESXi
9. Any Other Operating System

Although Microsoft Windows Server 2008 and Microsoft Windows Server 2008 R2 with SP1 seems the same it’s totally different, the driver also different so we cannot choose option Microsoft Windows Server 2008 R2 with SP1 to install Microsoft Windows Server 2008 standard edition.
Before I succeed installing Windows Server 2008 standard I tried to use option Microsoft Windows Server 2008 R2 with SP1 and it doesn’t work. Below is the picture of error when I use lifecycle controller program to install Microsoft Windows Server 2008 standard edition using option Microsoft Windows Server 2008 R2 with SP1:
Windows failed to start. A recent hardware or software change might be the cause. To fix the problem …. followed by a different file name missing message.
The errors above proof that using option Microsoft Windows Server 2008 R2 with SP1 will never work when try installing Microsoft Windows Server 2008 standard edition.
Use manual installation and boot directly from Microsoft Windows Server 2008 standard edition DVD installation.
Read on There are currently no logon servers available to service the logon request Error
Below are steps to successfully installing Windows Server 2008 Standard Edition on Dell PowerEdge R530 Server, I write this so that you don’t have to experience the same problems as mine.
1. RAID disk planning:
It depends on how many disks you have and how you want it to configure. We have 8 x 500GB SATA hard drives and we configured it 2 x 500GB RAID1 (mirroring) for Operating system, 5x 500GB configured as RAID5 and 1x 500GB configured as hot online spare. With above RAID configuration, our effective data volume becomes:
RAID 1 (2 disk) = 500GB
RAID 5 (5 disk) + 1 disk online spare = 2TB. So we have 2.5 TB capacity when using RAID combination above, but if we don’t use any RAID we will have 8x500GB = 4TB
Because this is a server that serves as a file server for about 300 busy peoples don’t afford to have long downtime.
If one disk fails on RAID1 (operating system) then we have other disks that will run without any performance degradation.
If one disk FAIL on RAID 5 (data ) then the online spare disk will kick in and system running without any performance degradation. If another 1 disk fail before we have a chance to replace the first broken one then we still have all data but with performance degradation. But if another one hard disk fails then we lose all data, so we have double protection here. We can have all the data if 2 hard disk fail. Although we lose the 1.5TB capacity for RAID configuration we have robust harddisk protection if one or two hard disks failed.
2. RAID disk setup
Setup RAID by pressing CTRL+R keys when the server start-up. The user interface is quite simple, you just need to highlight the controller type and then press F2 – Operation. Choose new virtual disk. Choose RAID1 (mirroring) and add the hard disk you want to include to RAID1. RAID1 need even quantity so it can be 2, 4,6, or 8 disks. Using the same interface we can create another new virtual disk for RAID 5 and add hard disk you want to include in this RAID. RAID 5 needs minimum 3 harddisk and your total hard disk capacity when using RAID 5 is n-1, where n is harddisk quantity.
3. Setup Windows Server 2008 Standard edition.
There is lifecycle controller option for assisted installation but we will not use this because our operating system is not on the list. If your Operating system on the list you can install it very easy, just follow the onscreen instruction and it will do the rest.
We need to insert bootable OS disk on the server, just follow … when you come to the screen to choose where you want to install the OS, you will not see the disk to choose, this is normal because the dick controller needs the correct driver. Download RAID controller from below, I got this URL from DELL support after I call them because I always failed to install Windows 2008 standard edition. http://downloads.dell.com/FOLDER03587450M/2/SAS-RAID_Driver_98GDG_WN32_6.603.06.00_A03.EXE
Extract to USB disk or flash disk and Plug it to the server you will need this when installing windows 2008 server.
4. Installing hard drive controller driver
This is the most important steps on successful installation, during operating system installation you come to this screen just click load driver and choose to browse and pointed to the location of RAID controller driver in the USB that you have already plugged into the server.
You will see many options of drivers, just highlight the second driver from the top and after that, you will see partition to install the operating system and choose that partition. After this stage, everything will be fine until the setup complete.
Again this is my experience with Installing Windows Server 2008 Standard Edition on Dell PowerEdge R530Server hope it helps.
Note:
There is SAS and SATA version of the Dell PowerEdge R530 Server hard drive but we choose SATA because this hard drive is easier to get and the price is also cheaper than SAS. If one of the drives need replacement in the future, we also can replace it sing SSD with the same or higher capacity. So by choosing SATA drive, we have more options to be applied.


