How to Redirect a Domain to Another with Cloudflare: Step-by-Step Guide
In today’s digital age, the ability to redirect a domain to another has become an essential skill for website owners and developers. Whether you’re rebranding your website, launching a new venture, or simply consolidating your online presence, ensuring a smooth transition is crucial.
One popular tool that can help with this process is Cloudflare, a powerful and user-friendly content delivery network (CDN) that offers a range of services to enhance website performance and security.
In this step-by-step guide, we will walk you through the process of redirecting a domain to another using Cloudflare, providing you with the knowledge and confidence to seamlessly manage your online presence. So, if you’re ready to learn how to redirect a domain to another domain using Cloudflare, let’s dive in!
Understanding Domain Redirection and Its Benefits
Domain redirection essentially involves sending visitors from one website domain to another. This can be useful in various scenarios, such as when you:
- Change your website’s domain name,
- Rebrand your business
- Merge multiple websites into one.
By redirecting a domain, you ensure that visitors accessing the old domain are automatically sent to the new domain without any interruption.
In the real example below we will redirect a domain savonlinnatravel.com to travellinglist.com
3 Steps to Configure Domain Redirection
1. Update NS record on domain registrar

You’ll need to update your domain’s nameservers to those provided by Cloudflare. This process can vary depending on your domain registrar, but generally involves accessing your account’s domain settings and replacing the existing nameservers with the ones provided by Cloudflare. This step may take some time as the DNS changes propagate across the internet.
2. Add 2 A records on Cloudflare

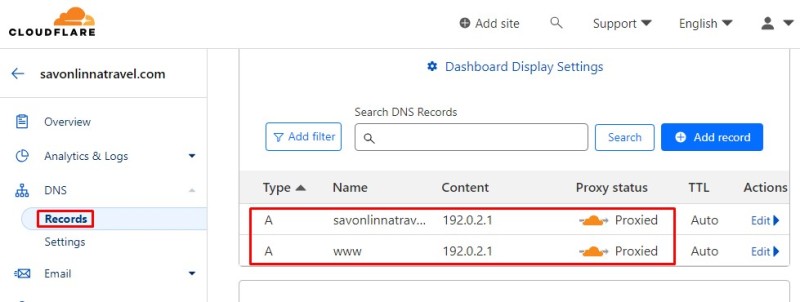
Add 2 A records on DNS:
Type: A
Name: savonlinnatravel.com
IPv4 address: 192.0.2.1
Type: A
Name: www
IPv4 address: 192.0.2.1
Make sure the Proxy status is orange, which indicates active. Check the picture below:
After adding 2 A records, the result should be similar to below:

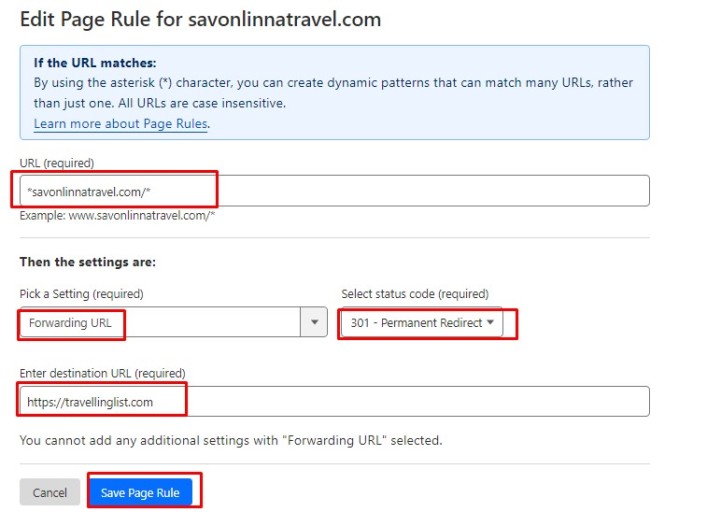
3. Configure Page Rules on Cloudflare

The asterisk (*) acts as a wildcard character, capturing any path that follows the domain.
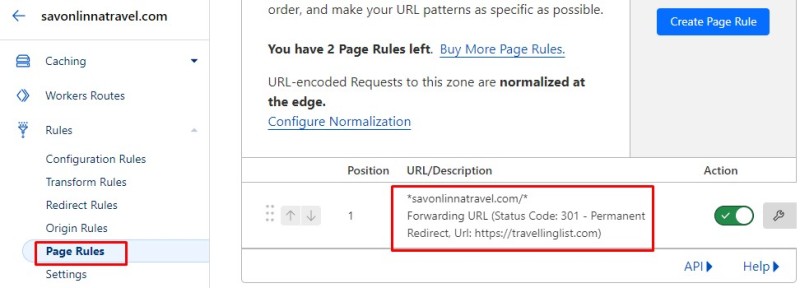
Once you’ve saved the Page Rules, Cloudflare will handle the rest. It may take some time for the changes to propagate, but eventually, all incoming traffic to the redirected domain will be seamlessly directed to the new destination. With Cloudflare’s powerful network and robust infrastructure, your domain redirects will be not only efficient but also secure.

Cloudflare will handle the redirection automatically, ensuring a seamless transition for your visitors.
Testing and Verifying the Domain Redirect Setup
After setting up the redirect, it’s crucial to thoroughly test and verify the setup. This involves checking if the redirect is working as intended and if any issues or errors are present. To do this, you can try accessing the source domain URL and observe if it automatically redirects to the target domain. Additionally, it’s essential to check different pages and URLs on the source domain to ensure that the redirect is consistent throughout the site.
Verifying the redirect setup also includes examining the impact on search engine rankings and traffic. Ensure that you monitor your website’s analytics closely to identify any changes in organic search traffic or backlink equity distribution. In some instances, it might be necessary to update any internal links or backlinks pointing to the old domain to maintain optimal SEO performance.
Troubleshooting Common Issues with Cloudflare Domain Redirection
If you’re facing issues with domain redirection using Cloudflare, you’re not alone. Many users encounter common problems that can hinder the seamless redirection of their domain. In this article, we’ll troubleshoot these issues and guide you on how to redirect a domain to another domain using Cloudflare successfully.
One of the most common issues users face is the incorrect setup of Cloudflare’s DNS records. To redirect a domain, you need to ensure that the DNS records for both the source and target domains are correctly configured. Double-check that the A records are pointing to the correct IP address or domain. Additionally, ensure that the Cloudflare proxy (orange cloud) is enabled for the source domain to ensure that the traffic is redirected correctly.
Another issue that might cause problems is caching. When you make changes to your domain redirection settings, Cloudflare’s cache might still serve older versions of your website, causing redirect loops or wrong pages to be displayed. To resolve this, clear the cache from the Cloudflare dashboard and consider purging your browser cache as well. This will ensure that the latest redirect settings are applied.
Lastly, if you’ve followed all the correct steps and are still facing issues, it’s crucial to review your SSL certificate configuration. Make sure that both the source and target domains have valid SSL certificates and that they are compatible with Cloudflare. If there are any certificate-related errors, check with your hosting provider or certificate issuer to troubleshoot and resolve them.
By following these troubleshooting steps, you should be able to resolve common issues with Cloudflare domain redirection. Remember to check your DNS records, clear the cache, and review SSL certificates. With a little patience and attention to details, you’ll successfully redirect your domain to another domain using Cloudflare without any hassle.
Implementing 301 Redirects for SEO and User Experience
In the world of search engine optimization (SEO), implementing 301 redirects is a crucial step to ensure both a positive user experience and to maintain your website’s rankings. A 301 redirect is a permanent redirect from one URL to another, indicating to search engines that the original URL has moved permanently to the new location. By implementing 301 redirects correctly, you can redirect traffic from an old domain to a new one, preserving link equity and avoiding broken links.
One popular way to implement 301 redirects is by using Cloudflare, a content delivery network and security service provider. Cloudflare offers an easy-to-use solution for redirecting a domain to another domain. To get started, you need to ensure that both domains are added to your Cloudflare account and have Cloudflare’s DNS services enabled.
To set up a 301 redirect using Cloudflare, navigate to the “Page Rules” section of your Cloudflare account. Here, you can create a rule that matches the old domain and sets up a redirect to the new domain. By specifying a 301 redirect, you ensure that search engines and users are properly directed to the new domain. This process can significantly improve user experience, as visitors will not encounter broken links or error pages.
Implementing 301 redirects is not only important for maintaining your website’s SEO rankings, but it is also crucial for providing a seamless user experience. By using Cloudflare’s page rules, you can easily redirect a domain to another domain. Remember to set up a 301 redirect to preserve link equity and ensure search engines recognize the move. By following these steps, you can successfully redirect your domain using Cloudflare and reap the benefits for both SEO and user experience.
Monitoring Traffic and Analytics After Domain Redirection
In today’s digital landscape, it’s crucial for businesses to constantly monitor and analyze their website traffic. But what happens when you decide to change your domain? Understanding how to redirect a domain to another domain using Cloudflare can be a valuable tool in maintaining your website’s visibility and ensuring that your analytics continue to provide accurate data.
When redirecting a domain, it’s important to consider the impact on your website’s traffic and analytics. By using Cloudflare’s domain redirection features, you can seamlessly redirect visitors from your old domain to your new one without losing valuable web traffic. This not only ensures a smooth transition for your users but also helps preserve the integrity of your analytics data.
To redirect a domain using Cloudflare, start by logging into your Cloudflare account and selecting the desired website from your dashboard. Navigate to the “Page Rules” section and create a new rule. Set the original URL to your old domain and choose the “Forwarding URL” option. Then, input your new domain in the destination URL field and select a “301 – Permanent Redirect” as the status code. Save the rule, and Cloudflare will handle the redirection automatically.
Once you’ve successfully redirected your domain, it’s important to monitor your website traffic and analytics. Tools like Google Analytics can provide insights into your website’s performance, including the number of visitors, page views, and user behavior. By regularly reviewing these metrics, you can ensure that your website is performing optimally and identify any potential issues that may arise after the domain redirection.
Monitoring traffic and analytics after domain redirection is essential to maintain the success of your website. By understanding how to redirect a domain to another domain using Cloudflare and staying vigilant with your analytics, you can ensure a smooth transition and continued success for your online presence. Stay proactive and keep a close eye on your website’s performance to make data-driven decisions and keep your online presence thriving.
Best Practices for Managing Redirected Domains with Cloudflare
Managing redirected domains can be a crucial task for website owners, especially when it comes to maintaining SEO rankings and user experience. Fortunately, Cloudflare offers a range of useful features to simplify the process. If you’re wondering how to redirect a domain to another domain using Cloudflare, here are some best practices to keep in mind.
Firstly, before setting up the redirect, it’s important to ensure that both the source and target domains are added to your Cloudflare account. This can be done by navigating to the “DNS” tab and adding the necessary DNS records for both domains. Once that is complete, you can proceed to set up the redirect.
Cloudflare provides a convenient way to set up redirects through the “Page Rules” feature. By creating a new rule and specifying the source domain as the URL pattern, you can choose the “Forwarding URL” option and enter the target domain. It’s crucial to select the “301 – Permanent Redirect” option to ensure that search engines recognize the redirect and pass the SEO value to the new domain.
Lastly, it’s important to regularly monitor the redirected domains and ensure that the redirects are functioning as expected. Cloudflare provides comprehensive analytics and logging features that can help you track the traffic flow and identify any issues that may arise. By keeping a close eye on your redirected domains, you can address any potential problems promptly and maintain a seamless user experience.
Redirecting domains using Cloudflare is a straightforward process that can be greatly beneficial for website owners. By following these best practices, you can effectively manage redirected domains, maintain SEO rankings, and ensure a smooth transition for your users.
Enhancing Website Performance with Cloudflare’s Domain Redirection Features
In today’s fast-paced digital world, having a website that performs optimally is crucial for any business. One way to enhance website performance is by utilizing Cloudflare’s domain redirection features. Redirecting a domain to another domain can have multiple benefits, such as consolidating web properties or redirecting traffic to a new URL. In this article, we will explore how to redirect a domain to another domain using Cloudflare.
Cloudflare is a widely-used content delivery network (CDN) that offers a range of features designed to improve website performance and security. One of these features is the ability to easily redirect a domain. To begin, you will need to have your domain registered with Cloudflare and have access to the Cloudflare dashboard. Once logged in, navigate to the DNS settings for the domain you want to redirect.
In the DNS settings, locate the record for the domain you wish to redirect and click on the pencil icon to edit it. In the Name field, enter the subdomain or path you want to redirect (e.g., “www” for www.example.com or “/oldpage” for example.com/oldpage). In the TTL field, choose a suitable option based on your needs. Next, select the CNAME record type and enter the destination domain you want to redirect to in the Value field. Finally, save your changes, and Cloudflare will handle the domain redirection seamlessly.
By leveraging Cloudflare’s domain redirection features, website owners can effectively manage their web properties and direct traffic to the appropriate destinations. Whether you are migrating to a new domain or consolidating multiple websites, this feature can simplify the process and minimize any disruptions to your users. Remember to follow the steps mentioned above when redirecting your domain, and enjoy the improved performance and enhanced user experience on your website.


